24 Zucchini Recipes

There is a lot of green in my life, these days.  The garden is growing and thriving for the most part, but I have way more zucchini and cucumbers than I know what to do with.  This weekend my sister-in-law and I shredded and sliced zucchini and then par boiled it so we could freeze it for future use.  And yet freezing the zucchini doesn’t change the fact that I need to eventually cook it, and in more than a few basic ways if I don’t want my family to get weary of seeing it on their plate.  Knowing this I set off to search the internet for some unusual zucchini recipes. Since I figured that I may not be the only person suffering with a surplus of zucchini I decided to share those recipes with you.

But before I go down the yellow brick road of zucchini recipes let me share some tips and images from my garden.

While everything is growing well without the use of any insecticide or fungicide, I didn’t make my rows quite as wide as I should have.  Walking down the rows without stepping on a leaf, squash, vine or beet is very difficult.  Tip #1: Remember to make the garden rows wider than 8 inches next year.  Yeah I know…you wouldn’t think you would have to tell me this, but evidently I had to learn the hard way.

IMG_6430

Love how the squash hold their bright yellow blooms, but next year I will plant more butternut and fewer summer squash.  Tip #2:  Summer squash requires a lot of time to preserve in order to eat it later.  Butternut, on the other hand, is simply picked and left to rest in a basket until you are ready to eat it.

PicMonkey Collage

And now the zucchini dish line-up.  Keep  in mind that more than likely you can substitute any summer squash for zucchini, in these recipes.

24 Zucchini Recipes

1.  Zucchini Bars from – Allrecipes

Screen Shot 2014-07-13 at 10.55.37 PM

Continue reading

Big Family Chili Recipe

After years of perfecting my chili recipe I found I had to increase the size of it, as my family grew.  Otherwise there was never any leftovers, and apparently my family believes that there ought to be chili to eat the next day.  After many variations this is my favorite recipe.

Screen Shot 2014-01-17 at 6.35.40 AM

Big Family Chili Recipe

2 pounds ground beef chuck (I used venison.)
1 pound bulk breakfast sausage
3 (15 ounce) cans kidney beans, drained
2 (28 ounce) cans diced tomatoes with juice
1 (6 ounce) can tomato paste
1 extra large yellow onion, chopped
3 stalks celery, chopped
2 green bell pepper, seeded and chopped
4 cups beef broth – I used bouillon.
1/2 beer
1/4 cup chili powder
1 tablespoon Worcestershire sauce
1 tablespoon minced garlic
1 tablespoon dried oregano
2 teaspoons ground cumin
1 teaspoon dried basil
1 teaspoon salt
1 teaspoon ground black pepper
1 teaspoon cayenne pepper

Brown meats in skillet. Add all ingredients to large stock pot and bring to a slow boil. Reduce heat to a simmer and cook for 1.5 hours. Or brown meat and add all ingredients to slow cooker, cook for six hours on low. No matter which method you use the chili will be better after sitting over night in the fridge.

*This recipe was previously shared.

No Knead Kitchen Aid Mixer Egg Bread

Some call it flu season, I call it soup season.  The fact is I make soup all year long, but during the cold months my family respects it as an appropriate meal.  One of my daughter’s previous boyfriends said that he was coming to visit the soup kitchen, when he ate dinner at our house.  Since he consumed my ham and potato soup in multiple large bowls I am calling this a compliment.

And we all know that nothing goes better with a bowl of soup, than a large hunk of crusty bread.  I decided that I needed to expand my bread horizons and try some new recipes and the best place to go for a bread ideas is the King Arthur website.  The recipe options are endless there and they feature cake, cookies and other goodies, too.

I chose a hearty egg bread titled, Italian Easter Cheese Bread.  If you own a Kitchen Aid Mixer this is about the easiest bread you can possibly make.  No kneading.  You won’t even see the word in my recipe one time.  Punch down?  Yes.  Turn over and shape?  Yes.  But no kneading.  Due to how incredibly easy it is to make and how well it goes with a large bowl of soup, I have renamed my version of this recipe – No Knead Kitchen Aid Mixer Egg Bread.  Sound simple enough?

Changes I made:  Eliminated cheese as I didn’t have any on hand.  Next time I may include it, though.  Added garlic, rosemary and dried onions.  If you’d rather follow the original recipe, click here.

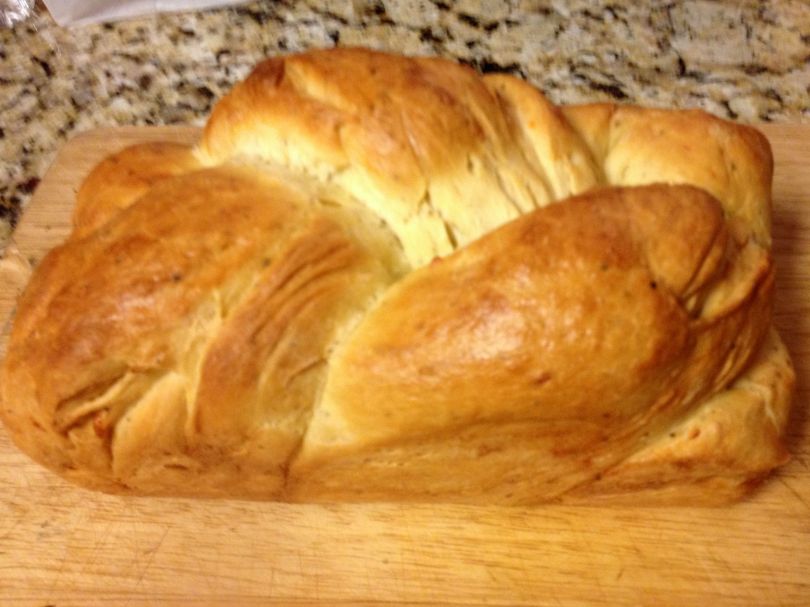
Here is my version…oh and don’t let the braid intimidate you.  It was easy enough to do, but if you have the new-to-bread-making jitters just follow the round loaf instructions.

bread

No Knead Kitchen Aid Mixer Egg Bread

  • 2 1/2 cups all purpose flour
  • 1 1/4 teaspoon instant yeast
  • 3 large eggs – recipe says at room temperature…I didn’t do this.  You can decide what works best for you.
  • 1 large egg yolk – keep the white you’ll need it later
  • 1/4 cup lukewarm water
  • 4 tablespoons softened butter – 1/2 stick (leave out on counter for 45 minutes or cut into small pieces)
  • 3/4 teaspoons salt
  • 1 teaspoon ground black pepper – use white if your kids (or you) object to black specks in their food
  • 1/2  teaspoon dried crushed rosemary (use up to 1 teaspoon if you enjoy this herb)
  • 1 teaspoon garlic powder
  • 1 tablespoon dried onion flakes

Combine all the ingredients in the mixer bowl.  Yep, you read that correctly.  No special order on this…just add and mix.  When well combined and formed into a ball remove from bowl and place in greased bowl.  Flip so all sides are oiled.  Cover with wet cloth and allow to rise for 1 – 1/2 hours.  It will not double in size.  If after one hour you think it hasn’t risen enough, allow to sit for another 30 minutes.  After that, punch down, flip over and cover with wet cloth for another hour.  Make sure that the cloth stays wet.  I put my dough near the fire to keep it warm as the house was cold, but the towel can dry out easily this way.  You don’t wan that to happen!

After two rises create a round loaf:

Punch down (you may need to grease your hands) and shape into ball and place into greased 6-7 inch soufflé dish.

or to create a braided loaf:

Punch down and divide into 3 equal pieces.  Roll (with greased hands, if needed) into logs the length of your loaf pan.  Braid and tuck into greased loaf pan.

Whichever way you choose to create your loaf, cover with wet cloth and allow to rise 1.5 hours.

Whisk the egg white you saved from earlier with 2 tablespoons cold water.  Brush over top of loaf just before placing in the oven.  This will give your loaf a beautiful shine and a crusty layer.

Bake at 425F – 15 minutes.

Reduce temperature to 350F and tent with foil.  Do not seal the loaf.  Just place gently over the top to keep it from burning.

Bake for an additional 30-35 minutes, or until it has a deep golden brown top.  If you braided your loaf it will take less time.

Remove from oven and allow to cool in pan for five minutes.  If the loaf is stuck to the sides use a knife to go around the edges.  Place on rack to cool.

Note:  This bread is so easy to make that my twelve year old baked it for me while I was away from the house. I had preheated the oven and brushed it with the egg white mixture.  Don’t doubt yourself just use common sense as you tent it and watch it brown.

Enjoy with your favorite soup and mix up the flavors with different herbs and cheeses!

Just make sure and come back to tell me what you did, so I can try it, too.

Durkee’s Sauce Copycat Recipe

There is very little doubt that I married into a very southern family.  When I went to meet my now deceased in-laws for the first time, my husband warned me that his father would ask which side my family fought on in The War.  I was expected to know that he would be referring to the American Civil War and fortunately I had the best answer available, as my family fought on both sides.  Later, I was to learn that this had less to do with him really caring about my family’s orientation during this period in history, and more to do with how I handled myself under this mild interrogation.  At least this time I passed the test.

Not long after meeting my father-in-law I learned that his favorite lunch was a peanut butter and jelly sandwich.  If his wife was away shopping and it was lunch time he would stroll to the kitchen and after grumbling a bit about not understanding what could keep her out so long, he would prepare a PB&J.  If for some reason he varied from this kid-like meal, he would create a ham sandwich on white bread with Durkee’s. As our oldest child grew and became able to enjoy this ritual with his grandfather, he too, loved this mustardy sauce.  Durkee’s became a staple in our house and if someone was having a sandwich and we were out, I was sure to hear about it.

It seems that in recent years the original Durkees recipe may have undergone some changes.  Many consumers of this product claim that it disappeared from the store shelves in recent years, and when it returned it was more gelatinous and less smooth.  I did notice that it’s current ingredient label includes xantham gum.  This food additive gives food a thick and sometimes smooth texture, and was discovered in the 1960’s.  As such, I doubt that it was in the original Durkee’s recipe since it is rumored to be over 100 years old.  Also, the lead ingredient on the current bottle is soybean oil.  This, too, sounds suspicious as soybean oil was not a common ingredient in foods at the time this recipe came into existence.  Either way, if you are looking to create and share your own Durkee’s like sauce you will find basic ingredients in my recipe and the taste is just the tangy mustard and vinegar flavor that has made this condiment so well liked through the years.  Whether you use it to make potato or chicken salad, on your ham sandwich, in deviled eggs, or on home-grown tomato sandwiches, you will find this recipe to be very similar to the original Durkee’s sauce.  Plus it is very easy to create!

photo-5

Durkee’s Sauce Copycat Recipe

  • 1 tablespoon all-purpose flour
  • 3/4 cup sugar
  • 1 tablespoon mustard powder
  • 1 cup whole milk
  • 2 egg yolks
  • 1/2 cup white vinegar

Thoroughly combine flour, sugar, mustard.  Add milk and yolks to a small saucepan and heat over medium heat.  Using a whisk add pre-mixed dry ingredients.  Whisk in vinegar.  Heat while whisking continually until the sauce comes to a boil.  Reduce heat to low and stir intermittently until thick.  Serve either warm over ham or chicken fingers, or refrigerate to use in sandwiches, deviled eggs or in salads.